36 Comments |
|
Jerry, USA | January 26, 2019 | Reply | | stitching technique you defined is totally so awesome
https://www.vectorkhazana.com/
| |
|
| |
Riya Dave, Surat | September 26, 2014 | Reply | | It is very easy to learn and also very easy to teach childrens. thank u. | |
|
| |
Megalagowri, Coimbatore | May 4, 2014 | Reply | | Nice stitch's superb | |
|
|
Webindia123, - | July 22, 2014 | | Thank you mam |
|
|
| |
Mrs . kavita achiket desai, Goa | May 8, 2013 | Reply | | Its more beautiful & creative. | |
|
| |
Ranjani, Chennai | September 26, 2012 | Reply | | It is very easy to learn and also very easy to teach childrens. thank u. | |
|
| |
M.Malarvizhi, Chennai | December 29, 2011 | Reply | | Feel easy to learn | |
|
| |
AARTI HARIA, INDIA | September 2, 2011 | Reply | | THAMKS FOR GIVING INSTRUCTIONS ON THE BASIC STITCHES I LIKE DOING EMBROIDERY AND UR INSTRUCTIONS WILL BE HELPFUL TO ME. WOULD U KINDLY PUT INSTRUCTIONS ON NEW STITCHES ALSO. I WILL BE GRATEFULL | |
|
| |
Ramya, Chennia | August 7, 2011 | Reply | | Hi
this tutorial was really very nice ...thank u so much ...i will definetly practice these. | |
|
| |
devi, palakkad kerala | July 25, 2011 | Reply | | realy very useful diagrams and explanations for the beginers. | |
|
| |
sandhya panambur, karnataka | June 2, 2011 | Reply | | very useful | |
|
| |
saltanat, New Delhi | May 22, 2011 | Reply | | Very informative | |
|
| |
lalitha ninan, chennai | April 9, 2011 | Reply | | very useful for the beginers. | |
|
| |
Dr.Ami, surat | April 1, 2011 | Reply | | its very nice work.please put more that type of work here | |
|
| |
shalee, kerala | March 20, 2011 | Reply | | very helpfull and simple works | |
|
| |
tamilselvi, chennai | March 6, 2011 | Reply | | i can"t belive,realy nice. | |
|
| |
Susan George, cochin | February 17, 2011 | Reply | | very simple and helpful | |
|
| |
jaspreet, mumbai | November 16, 2010 | Reply | | this is a lovely effort to teach basic embroidery stitches | |
|
| |
Thanuja Balan, Cochin | November 6, 2010 | Reply | | it is a very diffrent stiching in embroidery | |
|
| |
RANJU, AUSTRALIA MELB | October 31, 2010 | Reply | | HI I READ YOURATICLE WAS REALLY INTERESED DOING SOME NEDDLE WORK MYSELF I DO HUNGARIAN EMBROIDERY WHICH I REALLY LOVE WANT TO HEAR MORE FROM YOU THANK YOU | |
|
| |
Saiphul Mallick, Kolkata, India | October 16, 2010 | Reply | | Very useful site.
Thank you so much for stitches information. | |
|
| |
lakshmishree, vishakapatnam | September 3, 2010 | Reply | | hi this is very interesting to learn
with more elaborate pictures
| |
|
| |
Rupali, Kalwa | August 28, 2010 | Reply | | hi!!!! all embroidare so good presentation i realy lot's of thankfull... bye | |
|
| |
Anshuty agi, | August 10, 2010 | Reply | | I learned 5stitches 2day from this site thnx,ur concept is so easy and i think bt this people can learn more and more stitches | |
|
| |
MINNUMARIA, MUNNAR | August 10, 2010 | Reply | | USEFUL.MAY PUT THE FINISHED DIAGRAMS ALSO | |
|
| |
Dr. Anandavalli, Chennai | August 7, 2010 | Reply | | Good explanation which is easy to understand and work with. Expecting to see much more embroidery Work which can be done on sarees. Thank you. | |
|
| |
Antara, Kolkata | August 2, 2010 | Reply | | Awesum page for an amatuer like me.. thanks a lot for your efforts to make the readers undertsand the intricacies of stitches...
| |
|
| |
Bhasin Sunita, Mumbai | July 28, 2010 | Reply | | very much keen to learn new stitches definately this will help me lot to pursue my hobby | |
|
| |
prashant kumar , gurgaon | July 27, 2010 | Reply | | i want to know all about embroidery, embroidery stitches, Embroidry machine, machine head, Which design will make in which mechine....Please help me & advise. Tahnks | |
|
| |
MANJULA, coimbatore | July 24, 2010 | Reply | | it is very useful........ | |
|
| |
shenaz, mumbai | July 23, 2010 | Reply | | beautiful i kiked it much.I want learn this work can mail me such things through which i can learn. pls. | |
|
| |
junki ramteke, Nagpur | July 17, 2010 | Reply | | sufficient information | |
|
| |
sneha shah, surendranagar,gujarat | July 11, 2010 | Reply | | thanks 4 teaching new stiches. i always use anchor threads 4 my hand work._ | |
|
| |
ManoramaRamesh , kerala | July 7, 2010 | Reply | | I like to spend my free time in doing Embroidery i like this site | |
|
| |
sainamagiri, madurai | May 26, 2010 | Reply | | it wil good if some more details are added wit further 2 0r 3 steps | |
|
| |
Samapada Gurav, Mumbai | May 12, 2010 | Reply | | I want to learn this stitches.i love to do handmade workingin stitches | |
|
| |
Vidya, Dharwad | May 6, 2010 | Reply | | I learned lot of stitches from this web site. Stiches designs are ok, but you explain with picture step by step Thanks | |
|
| |


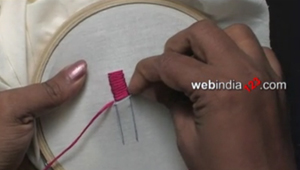
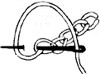 Work this stitch from the top. Bring needle up at the top of line. Make a loop with the thread and hold it in place with left thumb. Insert needle to the right where thread first came up. Now bring the needle out a short distance ahead on line, drawing needle over the loop.
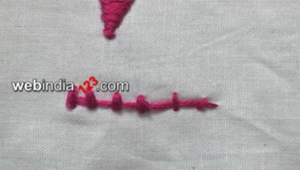
  Work a row of straight stitches, leaving the width of a stitch between every adjoining stitch. Make a second row of stitches in the same manner but interlock them with the first row of stitches. If you turn your work on its side, you will see how the stitches look like a brick surface.